In this post I'll be discussing how I built my Swordfish super heavy tank. I always wanted a heavier tank for the Tau (hint hint GW) and enjoy scratch building units, its a nice break from gaming. I always had an idea of a hammerhead-like tank with a longer body, a larger main weapon and potential transport capability. I messed around with a few idea's on paper and after doing some googling I found a design that I really liked.
One idea I found, I like the weapon system but it looks a bit top heavy and doesn't strike me as a super heavy.

I found this one online and it was similar to the concept that I had in my mind.
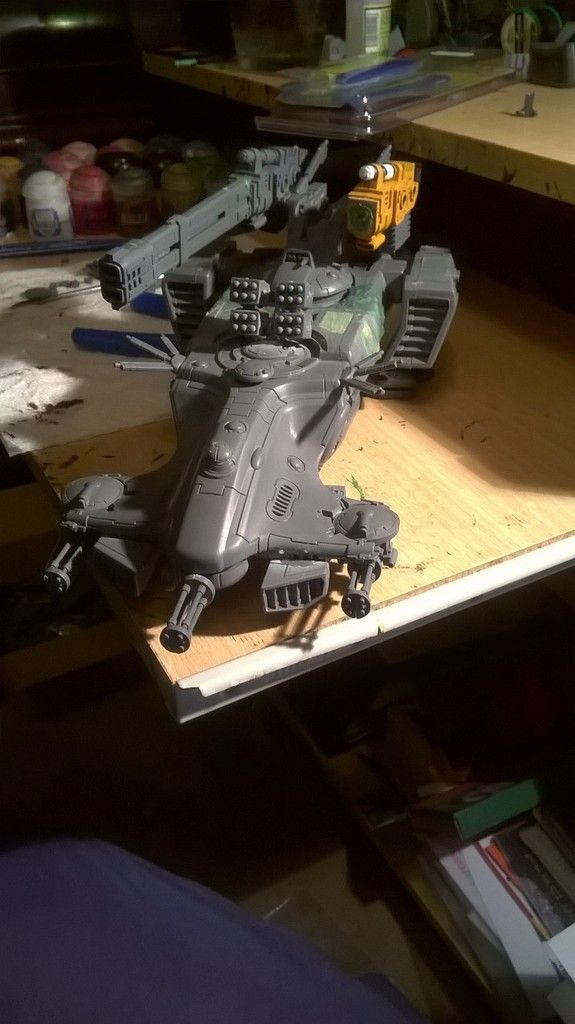
I bought a hammerhead and devilfish kit from a local gaming shop and a few bits on ebay namely a second railgun, skyray missile system and piranha engines. Before I started building the vehicle I did a mock up and wrote out step by step instructions on how to build the tank. I didn't want to make a mess of the build as the two kits and bits were expensive. I started by building the hull of the two tanks, the devilfish hull is the front of the tank as it has the burst cannon in the nose, I left the rear entry door off the tank. Once the two hulls were assembled I measured up the transport compartments and slowly cut the hammerhead hull in two pieces. I cut just behind the cockpit section, above the side entry doors.Once the cut was done I cut the engine mounts off the devilfish and glued the two hull sections together. Before I began sculpting with green stuff I reinforced the two hull sections with pieces of the sprue.
I slowly built up layers of green stuff and once the sculpted green stuff was flush with the plastic I sanded it down to make it smooth.
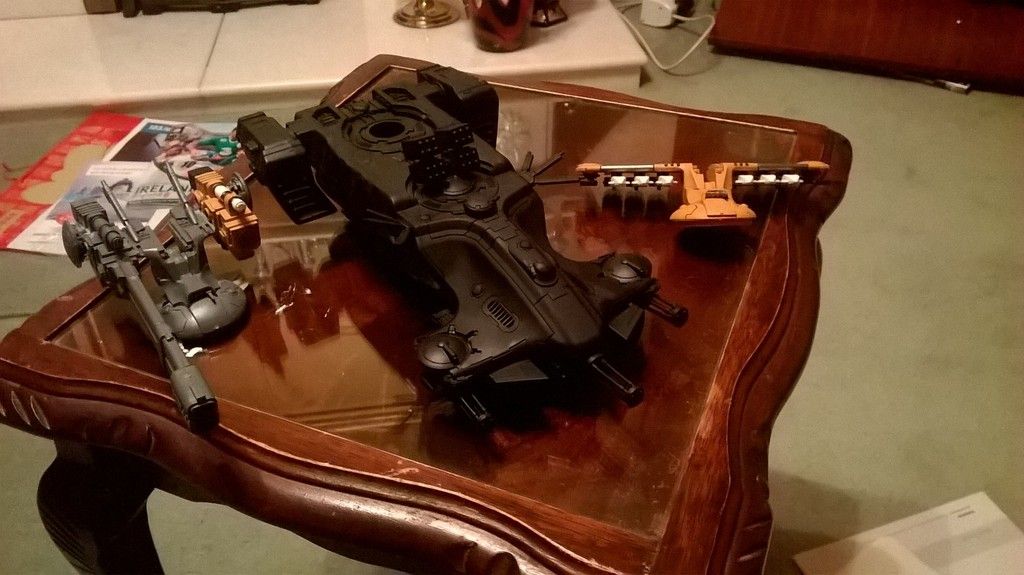
I changed my design and mounted the smaller engines under the wings on the front. I didn't like the idea of two set of main engines, which would block the side entry door and the exhaust of one engine would be blown into the other engine.
To build the main guns I assembled the skyray missile system and cut the wings down. On the front of the wings there are little notches, I made the cuts on the third one. The guns themselves are a combination of the hammerhead railguns and riptide ion accelerators. I cut the barrels off the ion accelerator and glued the long thing parts of the railguns to the ion accelerators. Then I cut the flat square parts off the railguns and glued the ion accelerator barrels to the railguns. I glued drones onto the sides of each gun and on the rear of the guns I glued the box part of the railgun to make it a little more balanced looking. Once the main gun was built I decided to put the spare skyray system together so I can interchange the two weapons.
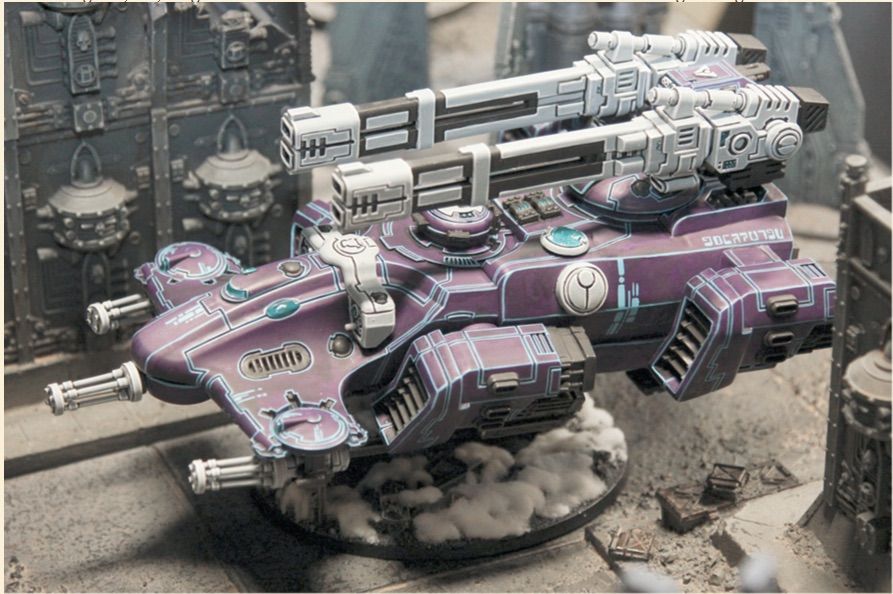
I stuck a few of the bits to the tank to finish it off, theres a shield generator on top of the tank infront of the large missile system, sensor spines on either side of the tank and the tank command parts on the front.
The finished tank.

I've played one game with the Swordfish and it suffered from new model syndrome and only killed a tank and a few marines. I looking forward to playing a few more games with it.
Batrep with the Swordfish http://40kabeginnerstale.blogspot.ie/2015/04/tau-v-dark-angels-2000pt-game-loss-13-7.html
 I found this one online and it was similar to the concept that I had in my mind.
 I bought a hammerhead and devilfish kit from a local gaming shop and a few bits on ebay namely a second railgun, skyray missile system and piranha engines. Before I started building the vehicle I did a mock up and wrote out step by step instructions on how to build the tank. I didn't want to make a mess of the build as the two kits and bits were expensive. I started by building the hull of the two tanks, the devilfish hull is the front of the tank as it has the burst cannon in the nose, I left the rear entry door off the tank. Once the two hulls were assembled I measured up the transport compartments and slowly cut the hammerhead hull in two pieces. I cut just behind the cockpit section, above the side entry doors.Once the cut was done I cut the engine mounts off the devilfish and glued the two hull sections together. Before I began sculpting with green stuff I reinforced the two hull sections with pieces of the sprue.
I slowly built up layers of green stuff and once the sculpted green stuff was flush with the plastic I sanded it down to make it smooth.
I bought a hammerhead and devilfish kit from a local gaming shop and a few bits on ebay namely a second railgun, skyray missile system and piranha engines. Before I started building the vehicle I did a mock up and wrote out step by step instructions on how to build the tank. I didn't want to make a mess of the build as the two kits and bits were expensive. I started by building the hull of the two tanks, the devilfish hull is the front of the tank as it has the burst cannon in the nose, I left the rear entry door off the tank. Once the two hulls were assembled I measured up the transport compartments and slowly cut the hammerhead hull in two pieces. I cut just behind the cockpit section, above the side entry doors.Once the cut was done I cut the engine mounts off the devilfish and glued the two hull sections together. Before I began sculpting with green stuff I reinforced the two hull sections with pieces of the sprue.
I slowly built up layers of green stuff and once the sculpted green stuff was flush with the plastic I sanded it down to make it smooth.
 I changed my design and mounted the smaller engines under the wings on the front. I didn't like the idea of two set of main engines, which would block the side entry door and the exhaust of one engine would be blown into the other engine.
To build the main guns I assembled the skyray missile system and cut the wings down. On the front of the wings there are little notches, I made the cuts on the third one. The guns themselves are a combination of the hammerhead railguns and riptide ion accelerators. I cut the barrels off the ion accelerator and glued the long thing parts of the railguns to the ion accelerators. Then I cut the flat square parts off the railguns and glued the ion accelerator barrels to the railguns. I glued drones onto the sides of each gun and on the rear of the guns I glued the box part of the railgun to make it a little more balanced looking. Once the main gun was built I decided to put the spare skyray system together so I can interchange the two weapons.
I changed my design and mounted the smaller engines under the wings on the front. I didn't like the idea of two set of main engines, which would block the side entry door and the exhaust of one engine would be blown into the other engine.
To build the main guns I assembled the skyray missile system and cut the wings down. On the front of the wings there are little notches, I made the cuts on the third one. The guns themselves are a combination of the hammerhead railguns and riptide ion accelerators. I cut the barrels off the ion accelerator and glued the long thing parts of the railguns to the ion accelerators. Then I cut the flat square parts off the railguns and glued the ion accelerator barrels to the railguns. I glued drones onto the sides of each gun and on the rear of the guns I glued the box part of the railgun to make it a little more balanced looking. Once the main gun was built I decided to put the spare skyray system together so I can interchange the two weapons.
 I stuck a few of the bits to the tank to finish it off, theres a shield generator on top of the tank infront of the large missile system, sensor spines on either side of the tank and the tank command parts on the front.
The finished tank.
I stuck a few of the bits to the tank to finish it off, theres a shield generator on top of the tank infront of the large missile system, sensor spines on either side of the tank and the tank command parts on the front.
The finished tank.
 I've played one game with the Swordfish and it suffered from new model syndrome and only killed a tank and a few marines. I looking forward to playing a few more games with it.
Batrep with the Swordfish http://40kabeginnerstale.blogspot.ie/2015/04/tau-v-dark-angels-2000pt-game-loss-13-7.html
I've played one game with the Swordfish and it suffered from new model syndrome and only killed a tank and a few marines. I looking forward to playing a few more games with it.
Batrep with the Swordfish http://40kabeginnerstale.blogspot.ie/2015/04/tau-v-dark-angels-2000pt-game-loss-13-7.html
No comments:
Post a Comment